Getting Started with HBase: A Hands-On Guide to NoSQL Data Storage
📌TL;DR
Deployed HBase NoSQL database using Docker Compose with Master, RegionServer, and Zookeeper components. Demonstrated column-oriented key-value storage operations including table creation, data insertion, scanning, and column family management. HBase excels at handling sparse data and real-time read/write operations on HDFS, bypassing MapReduce for faster access. Practical tutorial covers Docker setup, HBase shell commands, data manipulation (put, get, scan, delete), and architecture understanding. Perfect for developers transitioning from relational databases to distributed NoSQL storage for big data applications.
Introduction
HBase is a powerful NoSQL database that runs on top of HDFS (Hadoop Distributed File System), offering scalable storage for massive datasets. Unlike traditional relational databases, HBase is a column-oriented key-value store that excels at handling sparse data and real-time read/write operations. In this tutorial, I'll walk you through setting up HBase using Docker and demonstrate practical operations like creating tables, inserting data, and managing column families.
Understanding HBase Architecture
Before diving into the hands-on portion, let's understand how HBase works. The system consists of three main components:

HBase system architecture showing Master, Zookeeper, and RegionServer components. Image reference
- Master: Manages metadata and coordinates RegionServers
- Zookeeper: Coordinates the cluster and stores RegionServer information
- RegionServer: Communicates with clients and handles actual data storage
HBase bypasses the MapReduce engine, providing faster direct access to data stored in HDFS.
Prerequisites
Before we begin, you'll need Docker installed on your machine. You can verify your installation with:
docker -v
docker ps
docker images
Setting Up HBase with Docker
Creating the Docker Compose File
I'll use Docker to quickly spin up a complete HBase environment. Create a file called docker-compose-hbase.yml with the following configuration:
version: '2'

services:
  hbase-master:
    image: blueskyareahm/hbase-base:2.1.3
    command: master
    ports:
      - 16000:16000
      - 16010:16010

  hbase-regionserver:
    image: blueskyareahm/hbase-base:2.1.3
    command: regionserver
    ports:
      - 16030:16030
      - 16201:16201
      - 16301:16301

  zookeeper:
    image: blueskyareahm/hbase-zookeeper:3.4.13
    ports:
      - 2181:2181
This configuration uses pre-built Docker images from blueskyareahm that include scripts to automatically start HBase services when the containers launch. The images are based on Alpine Linux 3.10, keeping them lightweight.
Starting the HBase Environment
Launch the services with:
docker-compose -f docker-compose-hbase.yaml up
Tip: Add the -d flag (detach mode) to run containers in the background and keep using your terminal:
docker-compose -f docker-compose-hbase.yaml up -d
Verify the containers are running:
docker ps
Alternative: Traditional HBase Installation
If you prefer not to use Docker, you can install HBase traditionally:
- Download
hbase-0.90.3.tar.gzfrom the Apache HBase archive - Extract and navigate to the directory:
gunzip hbase-0.90.3.tar.gz
tar xvf hbase-0.90.3.tar
cd hbase-0.90.3
- Start HBase (assumes Hadoop home is set):
bin/start-hbase.sh
- Open the HBase shell (verify HMaster is running with
jps):
bin/hbase shell
Working with HBase Shell
Accessing the Shell
For the Docker setup, access the HBase shell with:
docker-compose -f docker-compose-hbase.yaml exec hbase-master hbase shell
This is equivalent to bin/hbase shell in a traditional installation.
Creating Your First Table
Let's create an employees table with two column families: private and public. Column families in HBase group related columns together for efficient storage and access.
Important: Watch your quotes! The shell is sensitive - if ' turns into ', commands won't work.
create 'employees', {NAME=> 'private'}, {NAME=> 'public'}
Inserting Data
Now let's populate the table with employee data. Each put command inserts a value into a specific row, column family, and column:
put 'employees', 'ID1', 'private:ssn', '111-222-334'
put 'employees', 'ID2', 'private:ssn', '222-338-446'
put 'employees', 'ID3', 'private:address', '123 State St.'
put 'employees', 'ID1', 'private:address', '243 N. Wabash Av.'
View the data:
scan 'employees'
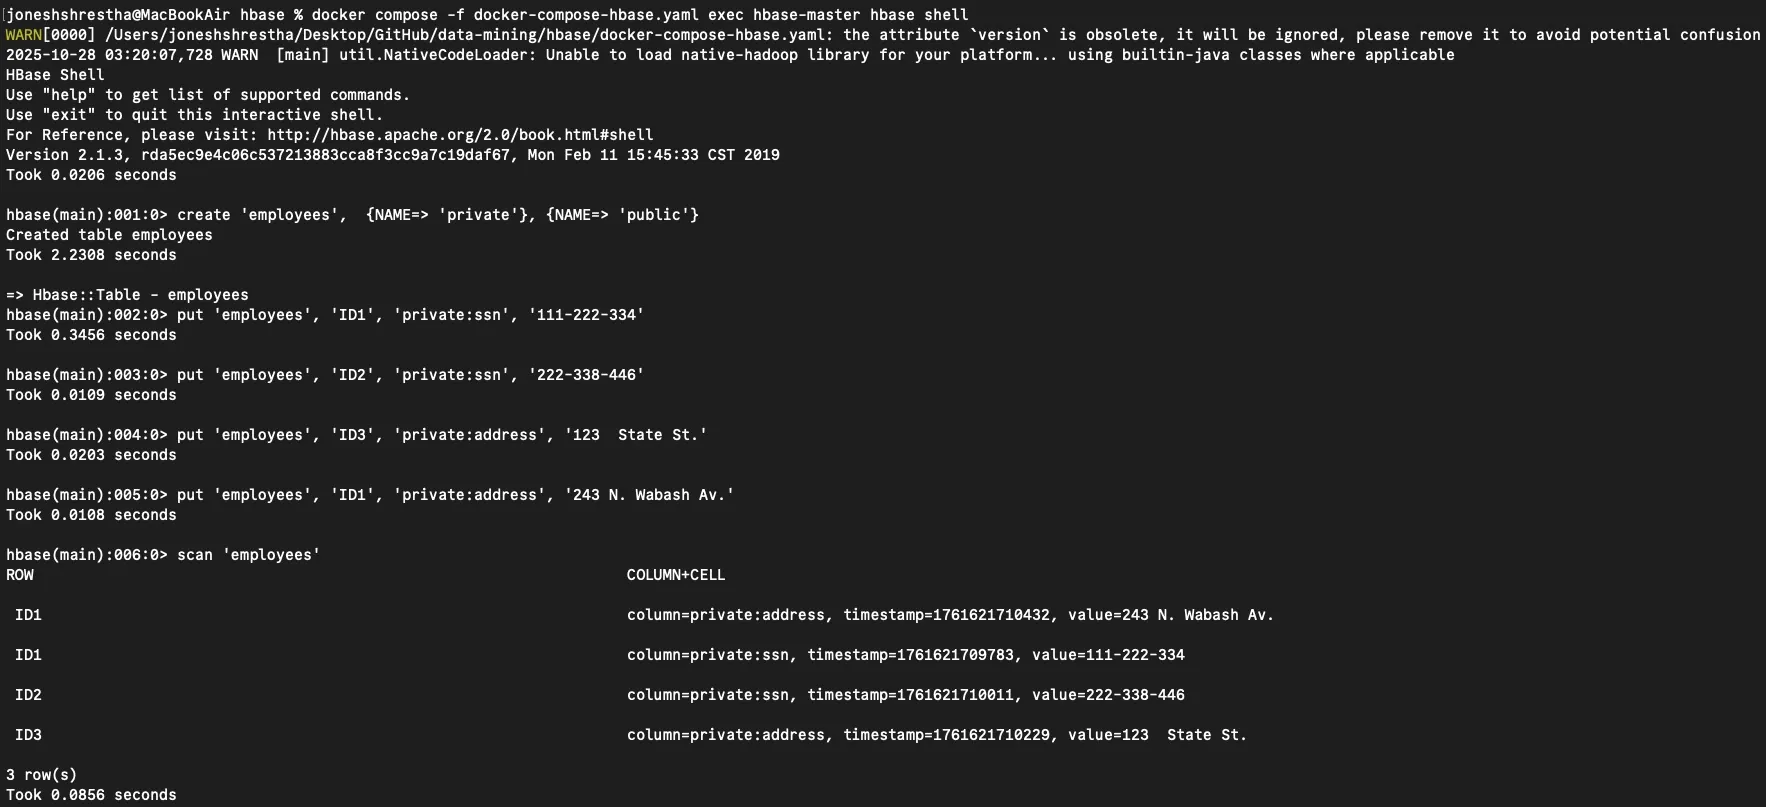
Initial employee table showing private addresses and SSNs for three employees
Expanding the Table
Let's add more columns to the private family and introduce data in the public family:
# Adding private information
put 'employees', 'ID1', 'private:dob', '05-12-1998'
put 'employees', 'ID2', 'private:dob', '11-08-1999'
put 'employees', 'ID1', 'private:phone', '312-971-1368'
put 'employees', 'ID3', 'private:phone', '312-973-3091'
put 'employees', 'ID2', 'private:salary', '400000'
put 'employees', 'ID3', 'private:salary', '250000'

# Adding public information
put 'employees', 'ID1', 'public:email', '[email protected]'
put 'employees', 'ID2', 'public:email', '[email protected]'
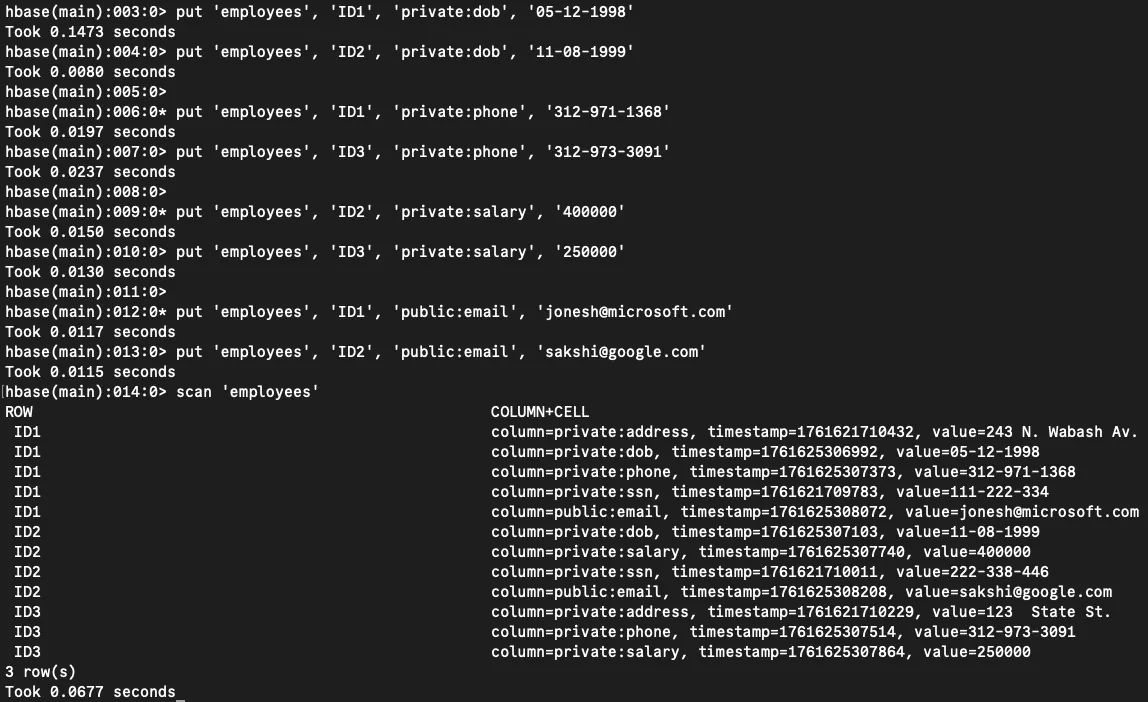
Employee table after adding dates of birth, phone numbers, salaries, and email addresses
Adding a New Column Family
Let's create a brand-new work family to store employment information:
put 'employees', 'ID1', 'work:position', 'AI Engineer'
put 'employees', 'ID2', 'work:position', 'Data Scientist'
put 'employees', 'ID1', 'work:department', 'Azure AI'
put 'employees', 'ID2', 'work:department', 'Microsoft Intelligence'
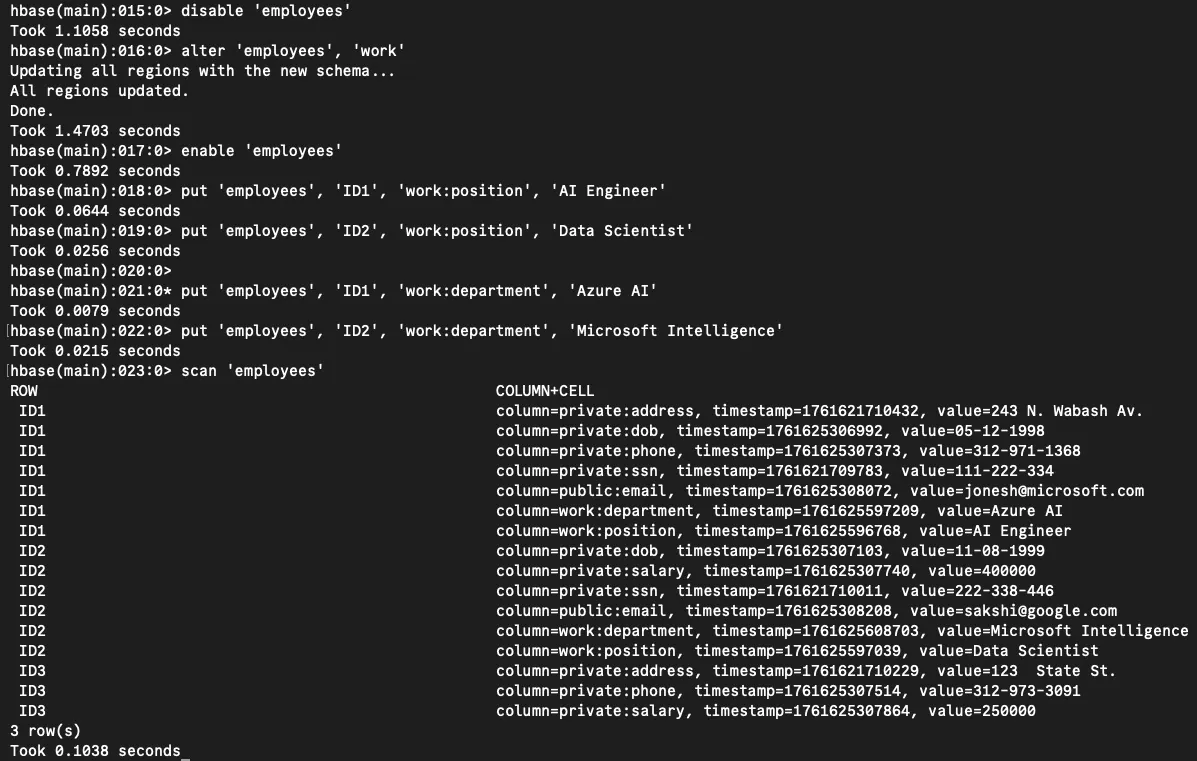
Complete employee table with work information including positions and departments
That's a total of (3 new private columns + 1 new public column + 2 new work columns) × multiple values = 12 additional data points inserted!
Modifying Table Schema
To add a new column family to an existing table, you need to disable it first, alter the schema, then re-enable it:
disable 'employees'
alter 'employees', 'work'
enable 'employees'
Bonus: Understanding Data Compression
Let's explore how different compression techniques affect storage size. Given the string: QQQQZZZZZAAAAANNN, where each letter takes 1 byte (8 bits).
Uncompressed Storage
The string has 17 letters × 1 byte = 17 bytes or 136 bits.
Run Length Encoding (RLE)
RLE replaces repeated characters with the character and count (e.g., QQQQ becomes Q4):
QQQQ→Q4(2 bytes)ZZZZZ→Z5(2 bytes)AAAAA→A5(2 bytes)NNN→N3(2 bytes)
RLE-compressed size = 8 bytes = 64 bits (52.9% of original!)
Dictionary Compression
Using a 5-bit code for each letter:
- Dictionary: 4 unique letters (Q, Z, A, N) × 5 bits = 20 bits overhead
- Encoded string: 17 characters × 5 bits = 85 bits (without dictionary overhead)
When RLE Fails
Consider the string QQBQQZZUZZAANNA (15 characters, 15 bytes uncompressed):
RLE breakdown:
QQ→Q2,B→B1,QQ→Q2,ZZ→Z2,U→U1,ZZ→Z2,AA→A2,NN→N2,A→A1
RLE-compressed size = 18 bytes = 144 bits - larger than the original!
Dictionary compression:
- Dictionary: 6 unique letters (Q, B, Z, U, A, N) × 5 bits = 30 bits overhead
- Encoded string: 15 characters × 5 bits = 75 bits (still better!)
Key Takeaway: RLE works well with long runs but can actually increase size when runs are short. Dictionary-based compression maintains consistent performance regardless of run length, making it more reliable for varied data patterns.
Conclusion
HBase provides a flexible, scalable solution for storing and accessing large amounts of sparse data. Through Docker, we can quickly set up a development environment to experiment with column families, data insertion, and schema modifications. The key advantage of HBase is its ability to scale horizontally and handle massive datasets efficiently - something traditional relational databases struggle with.
Understanding compression techniques also helps optimize storage, especially when dealing with big data scenarios where every byte counts.
Interactive Notebooks & Resources
- View my complete HBase project on GitHub: HBase Implementation
References
This tutorial was inspired by Blue Marble's excellent HBase Docker guide, which provided the foundation for the Docker setup approach.